During the past 15+ years working in internet marketing and as an SEO specialist with lots of experience in technical SEO, website development, and programming, I have worked on, optimized, designed, and developed numerous WordPress sites. One of the main tasks I had to take care of on many projects was setting proper redirection when launching a new site, moving an existing site to a newly redesigned version, or simply optimizing a website. As per my job requirements, I have also trained a handful of employees during all these years on optimizing a WordPress site, and setting up redirection was always an essential part of my training.
Now, if you have found yourself needing to tweak a page’s URL, change your WordPress site’s URL structure, or take down a page or two (these are common scenarios, but there might be more cases where you need to set a redirect) this post can help you find out the best practices and tools that you can do to achieve this.
Table of Contents
Why do you need to set a redirect in the first place?
The simple answer is to keep your site friendly for search engines and visitors. Here is a list of the reasons why you might need to set a redirect for your WordPress website:
- Maintain Site Friendliness: Redirects help keep your site user-friendly for search engines and visitors.
- Avoid 404 Errors: They prevent users from encountering 404 errors when clicking on old links, which is vital for user experience and SEO.
- Handle URL Changes: This is essential when you take down pages or change URL structures, like during a CMS migration or website redesign.
- Guide Visitors and Search Engines: Redirects guide both visitors and search engines to adapt to your site’s changes, ensuring seamless navigation.
- Preserve Link Equity for SEO: Setting redirects is crucial for SEO as it transfers the link equity from old pages to new ones, maintaining the value of existing backlinks and contributing to the site’s overall search ranking.
- Avoid Negative SEO Impact of Not-Found Pages: Redirects are crucial for SEO as they help avoid negative impacts from 404 errors. Search engine crawlers, which index your site, will view too many 404 errors as a sign of a poorly maintained site, decreasing its authority. Using 301 redirects informs these crawlers that the page has been moved or removed intentionally, ensuring proper indexing of the new target link.
What is a redirect anyway, and why does it matter for SEO?
It’s a way to tell browsers and search engines that a page has permanently or temporarily moved. You preserve your website’s integrity, SEO optimization, and user-friendliness by redirecting old pages to relevant new ones.
In this blog, I’ll blend the technical know-how with practical steps, giving you a clear, step-by-step guide on setting up 301 redirects (the most critical type of redirects as per SEO) in WordPress. Let’s dive in and keep your site navigation seamless and practical.
Different types of redirects
There are nine different kinds of redirects. I personally just recently discovered the 303, 307, 308, 410 and 451 redirects. The 301, 302, Meta Refresh Redirect, and JS Redirect are no-brainers, and I expect all SEOs, regardless of how basic or advanced their skills, to already know these four basic ones. These redirect types each serve their own unique purposes. As mentioned before, by using these redirect types, you are mainly sending the user who clicked your link to a different page that should be relevant to the content you initially published. This avoids the 404 errors and other technical SEO problems.
Picture the various types of redirects as unique rooms on the third floor of a hotel, each with its own story and purpose. Room 301, where the guest has checked out for good, never to return. Room 302, signaling everyone that the guest stepped out but would return shortly. And there are more rooms, each with its own story.
- 301 Redirect (permanently move): Room 301, where the guest has permanently checked out, tells search engines that your page has moved for good, passing its reputation to the new URL. This redirect type has the most implications for SEO.
- 302 Redirect (found but temporarily moved): Room 302, where the guest stepped out but will be back shortly. This one is for temporary absences. It keeps the old URL active while directing visitors and search engines to a new temporary location, like the restaurant on the main floor or the pool on the top floor.
- 303 Redirect (resource can’t be served again): Think of it as a detour sign in the hallway, redirecting you temporarily to a different but relevant page. It is not used for any SEO purposes. Still, it serves more for technical purposes, such as avoiding accidental form resubmissions when the user “refreshes” the browser or clicks on the “back” button.
- 307 Redirect (moved temporarily): This is like having a temporary room change while keeping your original room reserved. It’s akin to a 302 but maintains the original request method (POST, GET).
- 308 Redirect (redirected permanently): Imagine permanently moving to a new room but keeping all your original room service preferences. It’s a newer version of the 301, retaining the HTTP method of the request.
- 410 Redirect (page deleted): Picture this as a hotel room that’s been permanently closed off. Similar to Room 410, it indicates that the content once available there is now gone forever, and there’s no intention of bringing it back.
- 451 Redirect (page unavailable for legal reasons): Think of this like a room that’s temporarily sealed due to legal reasons. It’s used when content cannot be displayed due to legal restrictions, signaling to visitors that access is currently restricted.
- Meta Refresh Redirect: This is like the hotel telling you to hang tight in the lobby for a few seconds before guiding you to your room. They are not the most efficient, and Google isn’t a fan of these for long stays.
- JavaScript Redirect: Picture this as the hotel’s automated guide robot that takes a bit longer to show you to your room. It’s not the first choice, but it works if there’s no other way.
How to set up a redirection in WordPress
There are two main ways to set up a redirect in WordPress: you either have to do it using a plugin, or you have to do it by directly editing your WordPress .htaccess file.
1. By Editing the WordPress .htaccess File
You can set up a redirection by editing your WordPress site’s .htaccess file, located in the root directory of your WordPress installation. Exercise caution while editing this file, as incorrect changes can break your site.
To edit the .htaccess file, connect to your WordPress hosting server via FTP or your server’s control panel. There is no direct way to edit your site .htaccess file via the WordPress dashboard, although some plugins enable you to edit your .htaccess file via the dashboard, including Rank Math plugin.
2. By Using a WordPress Redirection Plugin
Another way, and perhaps the easiest way, to set a redirection in WordPress is by using a Redirection Plugin. There are many redirection plugins out there, here I will cover two of the most popular ones:
Overview of popular WordPress redirect plugins
1. Redirection

Redirection, with over 2 million active installations, is currently one of the most used plugins to set up redirects in WordPress. It provides everything you need to create and manage redirects right from your WordPress dashboard. It also tracks 404 errors in addition to letting you manage 301 redirects of your sites.
When there is a change in the permalink of a post on your site, this plugin automatically detects it and creates a 301 redirect without you needing to add a redirection manually. You can also customize your redirections based on certain conditions like the user’s browser and login status.
This plugin only offers 301 redirects and is 100% free. I recommend it to bloggers and small to medium-sized business owners as it can solve the redirection problem at no cost and with little to no effort.
2. Yoast SEO

Yoast SEO is one of the best plugins for on-page SEO and can also be used to set up redirects. It lets you set a wide variety of redirections, from the famous 301 (permanently moved), 302 (moved temporarily) to less known 307 (moved temporarily), 410 (page deleted), and 451 (unavailable for legal reasons) redirects.
You can use Yoast Redirect Manger to easily automate the redirection process on your website. If you make any changes to the permalink of a page, the plugin will automatically redirect the old link to a new one. However, if you delete the post, it will notify you immediately to add a new link to redirect.
Here is a complete list of Yoast Redirect Manager features:
- Automatic Redirect Creation: The Redirect Manager automatically creates redirects when you move or delete pages, which prevents dead-ends and 404 errors on your site.
- Management of Redirects: It allows you to see and manage all of your redirects directly from your site’s admin panel, where you can search, sort, filter, and easily manage them. It also offers options to undo, ignore, or disable automatic redirect creation and notifications.
- Selection of Redirect Types and HTTP Statuses: You can choose from different types of redirects and HTTP statuses, like 301 (Permanent redirect), 410 (Content deleted), 302 (Found) and 307 (Temporary redirect), and 451 (Content unavailable for legal reasons). This provides flexibility in handling various redirect scenarios.
- REGEX Redirects Creation: The Redirect Manager enables the creation of REGEX (regular expression) redirects, allowing you to redirect a group of URLs containing certain words or patterns with a single redirect, making it easier to handle large numbers of similar URLs.
- Import and Export of Redirects: It supports importing redirects from other systems in CSV format and exporting existing rules for making bulk changes.
- Scaling of Redirects: The Redirect Manager can handle a large number of redirects efficiently by configuring them to be written to a separate file, which runs directly in your Apache or NGINX config, ensuring fast processing.
Yoast is a very powerful on-page SEO plugin, but the Redirect Manager is a premium add-on, which means you have to subscribe to the Yoast yearly plan, which is $99 per year (plus taxes). I recommend Yoast premium to above-medium or large websites as the premium options are helpful, but you can find a free alternative for most of them. Yoast offers a free version, but to access premium features like the redirect manager, you must buy a premium plan.
Note: If you are a Rank Math plugin user, you can set up any redirect mode to a new URL or domain without installing any other plugins. Here is the resource for the Rank Math redirection setup.
Step-by-step setup guide to redirect URL using a plugin
To set up a redirect URL using a plugin, I will guide you through the process with the Redirection plugin, which is both free and highly popular for its ease of setup. Please follow the outlined steps below for successful implementation.
Step #1

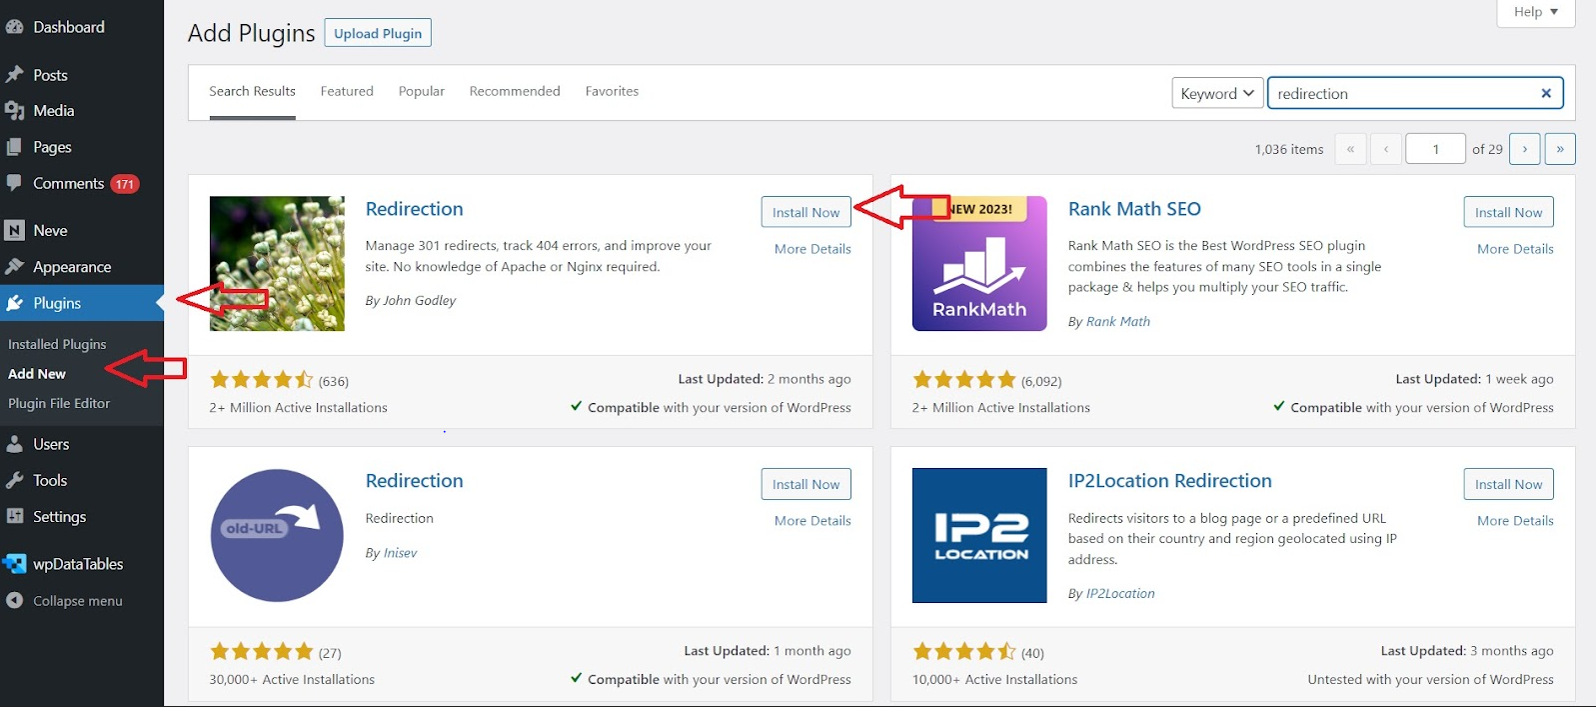
First, you have to log in to your WordPress dashboard and add this plugin. For this, you have to click on Plugins and then click Add New. Then, use the search bar and type redirection. This will show the plugin, and click Install now and then activate it.
Step #2

After activating the plugin, you have to return to the dashboard. In the tools section, you will see a new option called Redirection. You can use the plugin to set up redirect URLs by clicking on this.
Step #3

After clicking on Redirection, it will bring you to the startup page. Click on Start Setup to activate the plugin.
Step #4

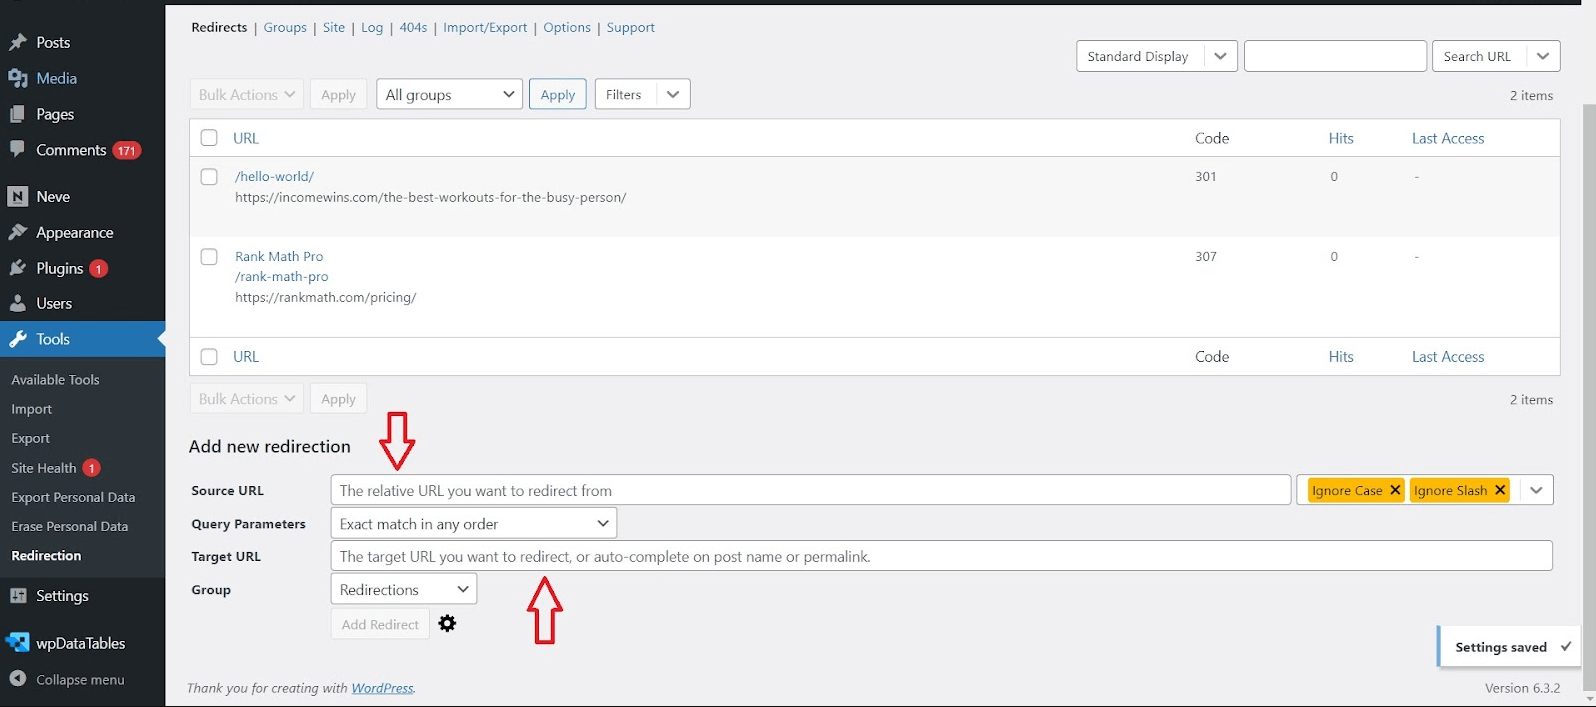
After the initial setup, you will get a screen(above) where you can finally set up the redirect link. Do remember the redirect you are setting up is 301. This is the default option if you use the Redirection plugin.
When you are done adding the Source and Target URL, you will find the option Add Redirect at the bottom. After clicking that, you are done. You will see that a new redirect is added to the list. To test it, click Check Redirect to see whether you are routed to the Target URL.
Step-by-step guide to setting up redirects in WordPress via .htaccess file
You can also set up the redirects in WordPress via your .htaccess file. This is for advanced users, but if you are comfortable editing server files, this will be very easy. To manually set up a new redirect, you must modify your WordPress .htaccess file. This is a configuration file on your WordPress root directory.
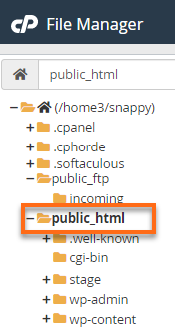
Log in to your host control panel (cPanel, Plesk, etc.) and go to your website Root directory where you have installed WordPress.

Now, find the .htaccess file and open it. This is where you have to set up redirect links manually.

If you want to redirect a single link permanently, type the following example in the file.
<IfModule mod_rewrite.c>
  RewriteEngine On
  RewriteRule ^old-page/?$ /new-page/ [R=301,L]
</IfModule>
The <IfModule mod_rewrite.c> directive in a .htaccess file is used as a conditional statement, and including it is not strictly necessary. It only checks if the mod_rewrite module is available and enabled in the Apache server. Here’s why it’s used:
- Safety and Compatibility Check: It ensures that the rewrite rules enclosed within it are only executed if the mod_rewrite module is available. This prevents server errors if the module is not enabled, making the file more compatible with different hosting configurations.
Note that the RewriteEngine On directive cannot be dropped as it enables the URL rewriting functionality provided by the mod_rewrite module. However, the RewriteEngine On line must be included only once to activate the rewrite engine for all the rules that follow.
Note that in this article, I include RewriteEngine On in each example, but remember that you only need to include RewriteEngine On once at the beginning of the .htaccess file. It enables the rewrite engine for the entire file, so it doesn’t need to be repeated before each new rule. This keeps your .htaccess file cleaner and more efficient.
There is also another shorter version to redirect an old page to a new one. Here’s how to set a simple 301 redirect from an old URL to a new one via the .htaccess file in one short line:
Redirect 301 /path-to-old-url/ https://website.com/path-to-new-urlNote that the Redirect 301 directive can be used without the RewriteEngine On statement. This is because Redirect is a directive from the mod_alias module, which operates independently of the mod_rewrite module. The RewriteEngine On directive is specific to rules that use the mod_rewrite module, like RewriteRule.
Also, note that the old URL does not include the domain part, but the new URL, which follows the old URL, should include the domain. A space separates the old and new URLs.
If you want to Redirect a Group of Pages in WordPress, you can use Regular Expressions in .htaccess (requires mod_rewrite):
RewriteEngine On
RewriteRule ^old-folder/(.*)$ /new-folder/$1 [R=301,L]
If you would like to Redirect www to non-www, you can use the following rules:
RewriteEngine On
RewriteCond %{HTTP_HOST} ^www\.example\.com$ [NC]
RewriteRule ^(.*)$ http://example.com/$1 [R=301,L]
If you wish to Redirect non-www to www on WordPress, you can use the following syntax:
RewriteEngine On
RewriteCond %{HTTP_HOST} ^example\.com [NC]
RewriteRule ^(.*)$ http://www.example.com/$1 [R=301,L]
For Redirecting HTTP to HTTPS on WordPress, you can use this code:
RewriteEngine On
RewriteCond %{HTTPS} off
RewriteRule ^(.*)$ https://%{HTTP_HOST}%{REQUEST_URI} [R=301,L]
And if you want to redirect your entire site to a new one, you can use this code:
  RewriteEngine On
  RewriteCond %{HTTP_HOST} ^old-domain\.com$ [OR]
  RewriteCond %{HTTP_HOST} ^www\.old-domain\.com$
  RewriteRule (.*)$ http://www.new-domain.com/$1 [R=301,L]
Be sure to test your changes immediately after making them, as any mistake can make the whole website crash. I also recommend you back up your .htaccess file so that you can recover it in case something goes wrong.
Pro Tip: Other than directly editing the .htaccess file or using a redirection plugin, you can also set redirects in your WordPress site using Cloudflare or your hosting control panel. However, plugins and .htaccess are the most commonly used methods.
Conclusion
Redirects are an essential tool for every website owner, vital for maintaining a stable WordPress site. Whether changing the permalink structure or fixing a broken link, redirecting is crucial to avoid negatively impacting your WordPress site SEO.
For beginners unfamiliar with advanced site files, using a plugin to configure redirects is a straightforward option. If you’re comfortable editing WordPress files, you can directly edit the .htaccess file to implement redirects.

